Bibliography:
[1] IGN. (2020). Kojima Productions’ Death Stranding Reveal Trailer – E3 2016. Available: https://youtu.be/i2nuHEGhwiw. Last accessed 15/12/2021.
[2] Zelda CDi Reanimated. (2020). The Zelda CDi Reanimated Collab!. Available: https://www.youtube.com/watch?v=FvxE6IUCPxU&ab_channel=ZeldaCDiReanimated. Last accessed 15/12/2021.
[3] Kendra Cherry. (2021). List of Phobias: The Most Common Phobias From A to Z. Available: https://www.verywellmind.com/list-of-phobias-2795453. Last accessed 15/12/2021.
[4] Joel G. (2021). ENA – Temptation Stairway. Available: https://youtu.be/juBv2XWnwt8. Last accessed 15/12/2021.
[5] Louis Dioso. (~2021). 11 Animals That Get Scared Easily (Answered!). Available: https://animaldome.com/animals-get-scared-easily/#Rabbits. Last accessed 16/12/2021.
[6] Richard Williams. (2009). Building Walks in Animators survival kit.
[7] Tina O’Hailey (2010). Hybrid Animation Integrating 2d and 3d Assets. New York: Routledge. 18-25.
[8] T4rget. (2017). Quarter City | Cities: Skylines Easy Layout in 2 Hours (Timelapse Build). Available: https://www.youtube.com/watch?v=TYvWO7Eyfgk. Last accessed 27/01/22.
[9]Kristof Dedene. (2020). Shader/Tutorial Ghibli anime style clouds for blender. Available: https://www.youtube.com/watch?v=ZwhK51dSSbk. Last accessed 27/01/2022.
My class was tasked with creating a 30 second trailer for a hypothetical game, animation or a VFX sequence (to give the illusion of a finalised product) in groups for the theme “Excitement” using an industry standard production pipeline. This was a brilliant opportunity to sharpen communication skills, collaboration skills, ability to organise ourselves and split the workload evenly which will be beneficial experience for us to have no matter what industry / company we decide to work at. The research, idea generation and production pipeline was already quite familiar for us due to our last year FMP (final major project) however we will have each other to manage and work with added in to the mix. Unlike a professional team, we do not have managers, directors or any leaders in our group, are are all equals which on one hand is great as we only have each others, and our own visions to realise however it could cause problems with inconsistency and or cohesion. However, if this project does not turn out as we think it will, we would still have learned new forms of problem solving and collaboration.
Generating ideas:
With this, my group (Aidan, Noah, Will and me) began brainstorming our ideas. Here is a mindmap we came up with:

The first thing we did was define excitement, which is: the state of being excited or roused into action; agitation; commotion. This helped us think more clearly about the theme and what we were going to do to show that theme in our own way. We then thought about what type of trailer we would create (a cinematic trailer or a teaser trailer) and for which media. Aidan has suggested to take a look at E3 reveal trailers (specifically Death Stranding[1]) which are usually trailers that set the mood of the game (and sometimes genre).
For example here, we are shown the style of the game, the main character and their setting, the atmosphere and hints at themes without revealing too much to allow the viewers to theorise about it themselves and to build excitement. This type of trailer would be ideal for our project compared to a cinematic trailer as it would show snippets of things the main character (and the viewer) will experience which could be split up into sections each of our team members could work on and manage, instead of showing a more finished product and a storyline.
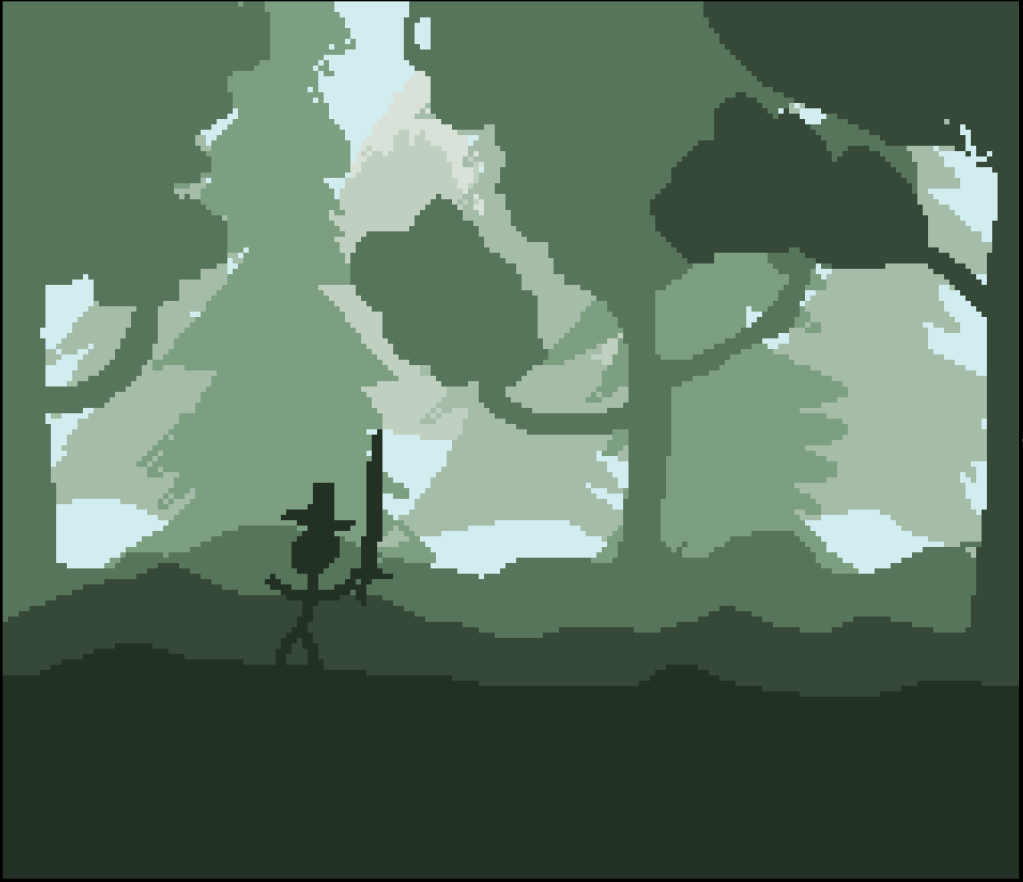
Since our group isn’t specialising in VFX, we thought we could try creating a 2D game level (specifically pixel art). I made a quick monochrome mock up of what the game would look like in a pixel art style in Photoshop ( Here I experimented with layering colours and background elements to simulate the paralax effect inspired by Terraria and Katana Zero where the foreground elements are darker while the background elements get lighter the further away they are) while we considered whether we should go through with it or not. I enjoyed utilising a monochromatic colour palette quite a lot and want to do more experimentation with it. Aidan has also suggested using a storyboard he created for an old concept (which was horror and action related, very relevant to our theme) so that we could have a starting point and build off of this which was a good idea. After some more idea generation (as seen below) and more consideration we realised that we cannot create a game level as no one in our group has any coding knowledge and we did not have enough time to learn so we decided to go for an animation instead. Our concept (as seen later on) was also pretty linear which was another reason creating an animation was a good decision.
To fully showcase our individual styles, Will suggested that we create something similar to Love Death & Robots (a Netflix series where each different episode is created by different studios) and the “reanimate” projects on YouTube such as The Zelda CDi Reanimated Collab![2] (a project where a group of animators choose a snippet of an already existing project and reanimating it in their style and interpretation). This would be ideal as Noah and I are specialising in 3D while Will and Aidan specialise in 2D which was first seen as an obstacle but is now a wonderful opportunity to show off our individual skills and styles in our chosen fields. One of us suggested that we create the 9 layers of fear (kind of like the 9 layers of hell) which is very convenient as we can make transitions from our varying art styles smoother and make it make sense in the story of the animation.
Primary and secondary research:
All of us are fans of horror and so we thought it would be interesting to create something in that genre, and since our theme was excitement we decided to focus on fear ( a type of excitement). We have decided to look at a list of phobias [3] and sort them all out into groups in this mindmap. We discussed each one and highlighted ones that were particularly interesting to us/relatable.

Our group decided that our target audience would be young adults and teens as this topic could be very personal and we would like our experiences with fear to be as relatable as possible, so the best results shall be achieved if we target our peers. However it could be as broad as 20-40 as anyone could be a horror enthusiast. So, in order to find out more about our target audience we did a survey on fears and how they affect our peers. Here are the most interesting results:
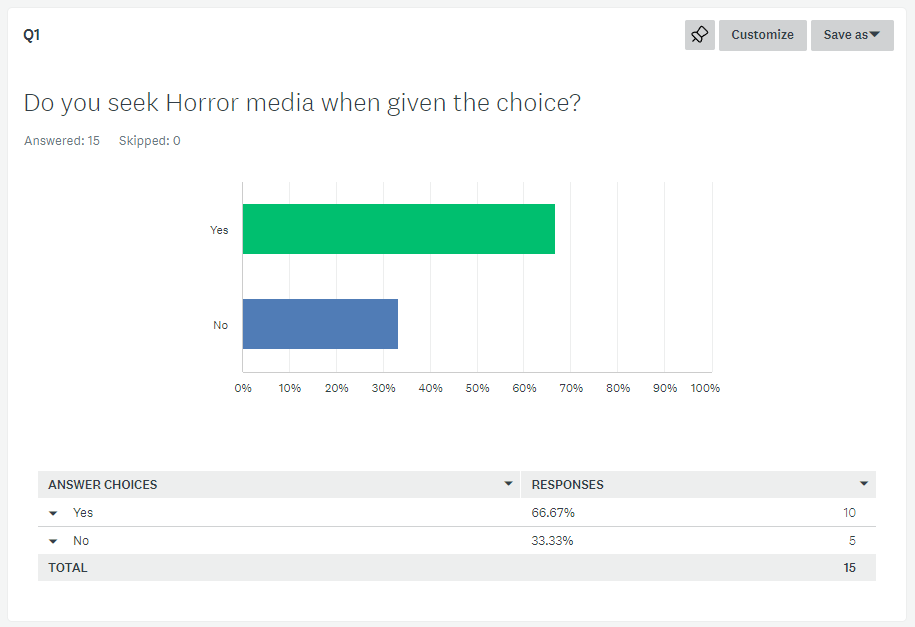


Of course, since this was early on in the idea generation stage, so the first question we asked our audience the most obvious one; do they like the horror genre? This was important because we needed to see if our audience will be interested and engaged in our project. More than half of our audience reported that they enjoy horror as much as we do so we were safe to carry on.
The second question and third questions were about biggest fears and other fears our audience struggled with. This gives us insight into what fears would be best to cover for relatability and here were their anonymous responses (they couldn’t fit onto the screenshot provided, also duplicates were removed):
Losing someone close to them, bodily fluids, rejection, inevitable ending of childhood, deep and dark ocean, drowning, being alone, Emrakul (large tentacle monster, from Magic The Gathering), pure isolation, exposure, heights, spiders, getting old, what’s after death (the unknown) loneliness, other people, knives, people looking at them, claustrophobia and acrophobia, darkness and sleeping, the fear of how people see them, ingrown hair.
This is very insightful as we find that the fear of spiders, the ocean, loneliness, heights (and of course Emrakul) is a common experience between us and our audience (these responses also came up more than once). We took this into consideration and began picking out the 9 fears we could represent. We chose the fear of; heights, the dark, spiders, repetition, crowds, the ocean, empty spaces, chaos and the unknown.
All these questions were very important to ask because we need to know if our ideas align with the preferences and demands.
Our product is a free, Youtube animation so it will target the average Youtube user (15-50). Because it is free, income of audience does not matter which can broaden our audience. It shall also reach more people due to its genre (horror is very popular according to https://stephenfollows.com/profitable-horror-movies/). Our unique selling point is collaborative animation with varying styles that explores our own experiences with fear and phobias.

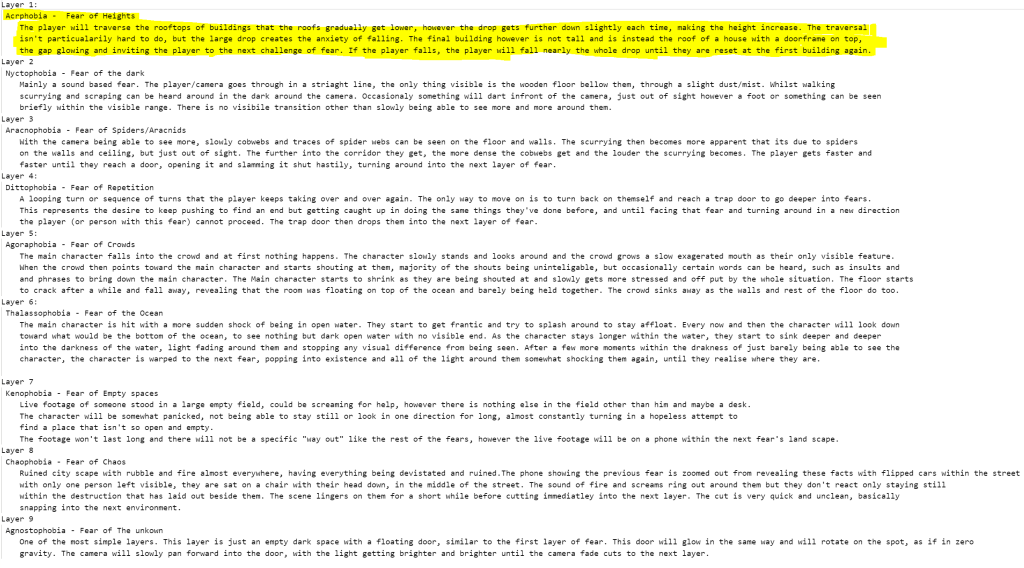
After choosing the fears we began discussing and conceptualising how we would represent each phobia and how we would structure the entire animation. The document above shows a brief outline of the events that will transpire and how they will all transition from one to another. Due to time constraints, we had to choose one layer each to animate, and due to experience (fun fact: rock climbing in year 6 is horror inducing if the only thing that is supporting your weight is about 5 12 year olds) I chose the fear of heights.
At the time when this description was written we were still deciding which media to create which is why it says “player” and not “main character”. I will be using this description as a rough guide to create a storyboard.
We have also brainstormed a little bit and decided to try out a variety of styles for each of our respective parts that we have to animate and I thought it would be a good idea to try out a blend of 3D elements and 2D pixel art inspired by ENA [4] (a series of animations on YouTube). The fact that everything is so chaotic and filled with different artistic inspirations and styles encourages me to be more fluid and experimental with my designs.
More research into the styles I want to try out lead me to many different pixel artists on twitter, so I chose a few for guidance. I find the lineless and shaded style most intriguing due to its ability to show off different shapes and textures through the use of colours rather than lines.

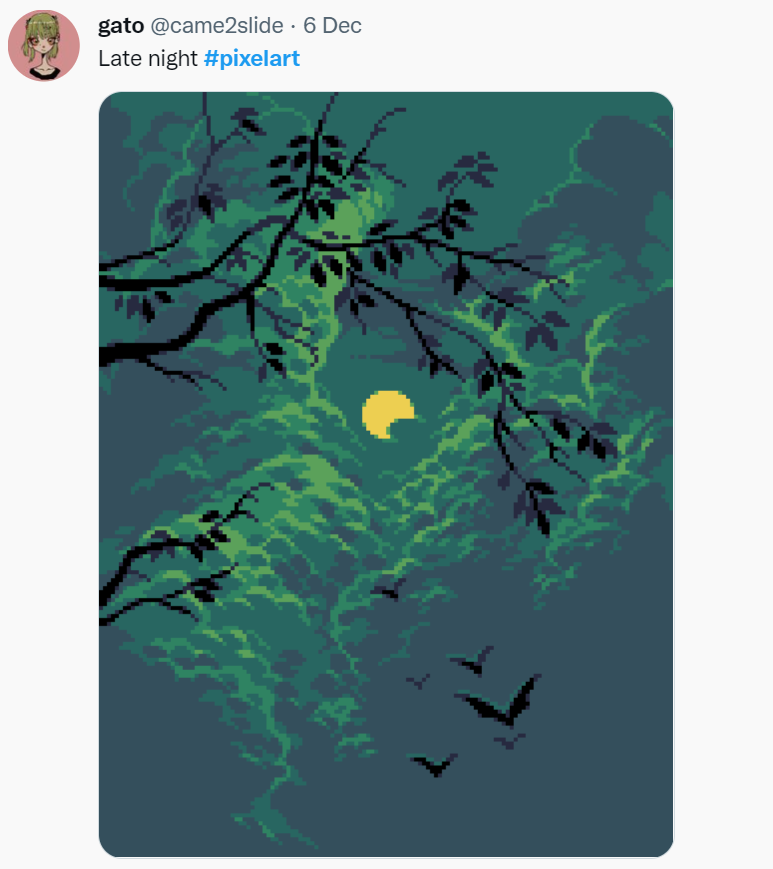
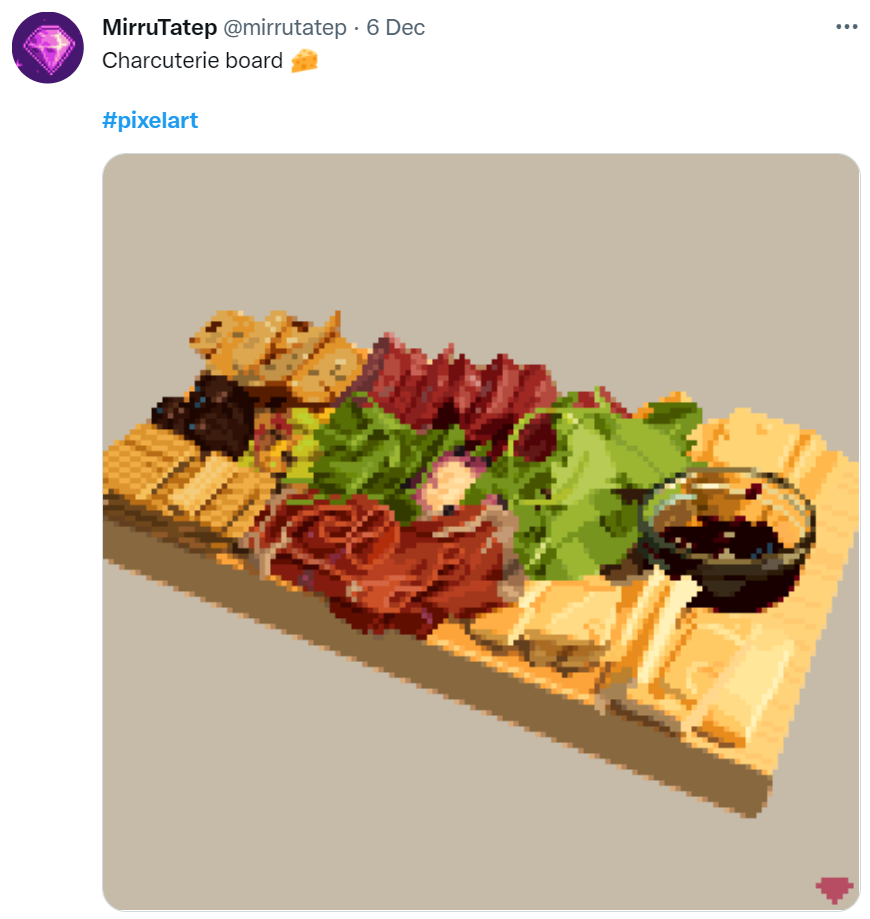
After this, I decided to try and create my own pixel art, something I haven’t done in a long long time. It turned out pretty well in the image below! I enjoyed shading the tree and the leaves however I wish I showed the bark texture using less lines, which is something to look out for next time.

We, as a group, then decided that we should create a main character for the animation so I started working on a design. Due to the fact that our chosen topic was fear I thought it would be a good idea to design a character after an animal that gets scared easily so I researched which animals are the most likely to be scared of things and according to animaldome.com [5] the top 3 are:
Cats, dogs and rabbits!
Cats and dogs are anxious when their environments change as they are domesticated (for eg when you move houses as a cat or a dog owner, your pet will be extremely cautious and anxious for the first week or so), while rabbits are cowardly because of the countless predators hunting them in their natural habitat. This was the most interesting to me, so I decided to try and design a rabbit character for our animation. Here are my attempts!

The white rabbit and the black rabbit were designed with a monochrome colour scheme in mind, as I wanted to experiment with shapes and different style of shading (the checker pattern on the ears). The blue rabbit was more of an exploration into a bigger palette.
After this I wanted to try and make a fuzzy looking rabbit, however after I failed to create a good looking texture, I started to create a squiggle like pattern and thought it could be an interesting character design to leave it just how it is, with no ears. I gave it humanoid arms and legs and big expressive eyes with a set of eyebrows.

It gave me an idea that it would constantly be writhing and wriggling as it moves to give it more character, similar to what one of my favourite animation artists do with their characters which can be seen here ↓ [7]. They animate on twos (which means the drawing stays on for 2 frames instead of one) to make the wiggle look a bit less intrusive which is something I will also do in my animation.
Then due to tradition I decided to do a walk cycle animation test (used this image below as guidance) to test out my method of creating the squiggles. I used firealpaca for this (free photoshop alternative) as its quick to set up and has a built in gif creating feature.
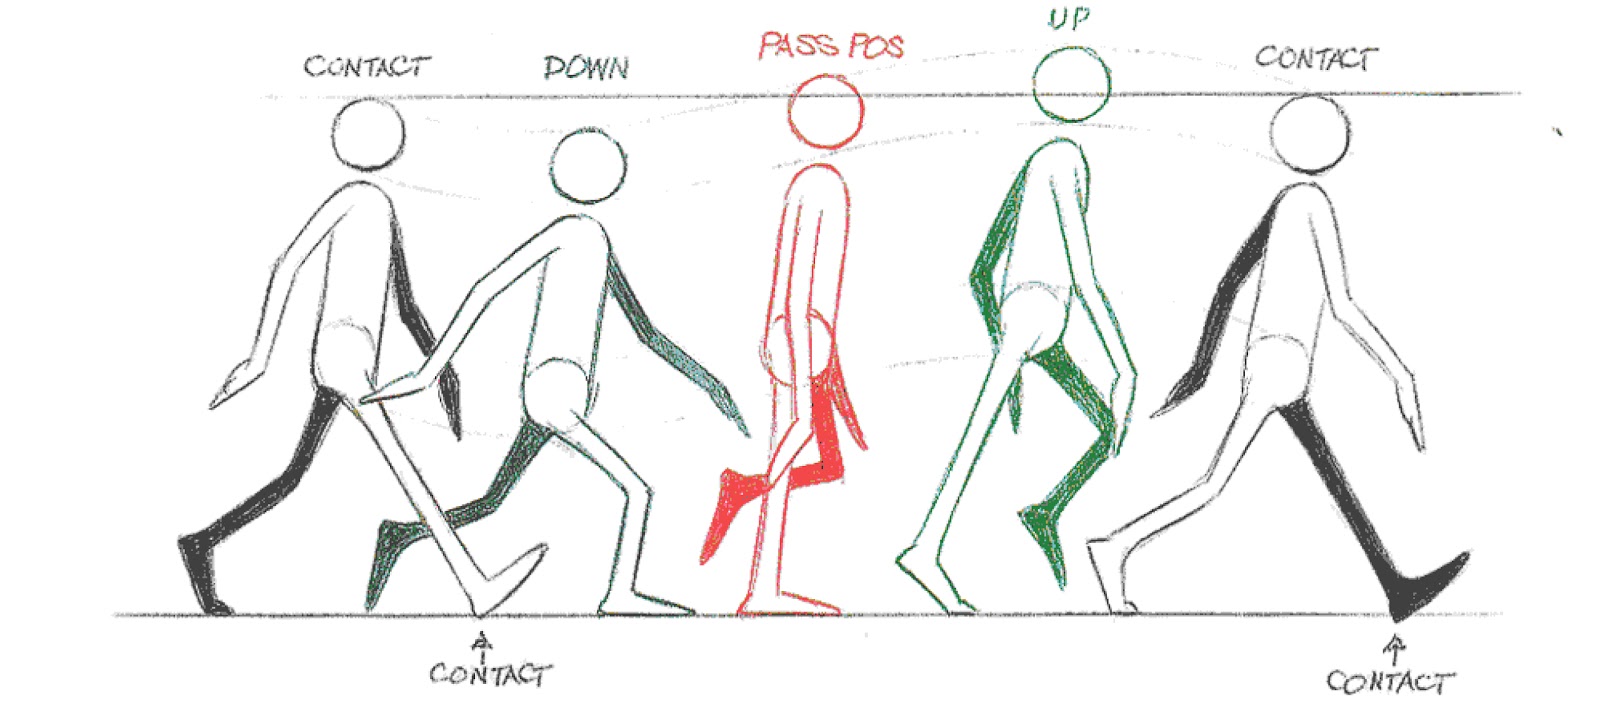
This was animated on twos just like the animation I was inspired by and safe to say it was slightly more tedious than usual and the squiggle isn’t as prominent in a pixel art style however its not bad being subtle.

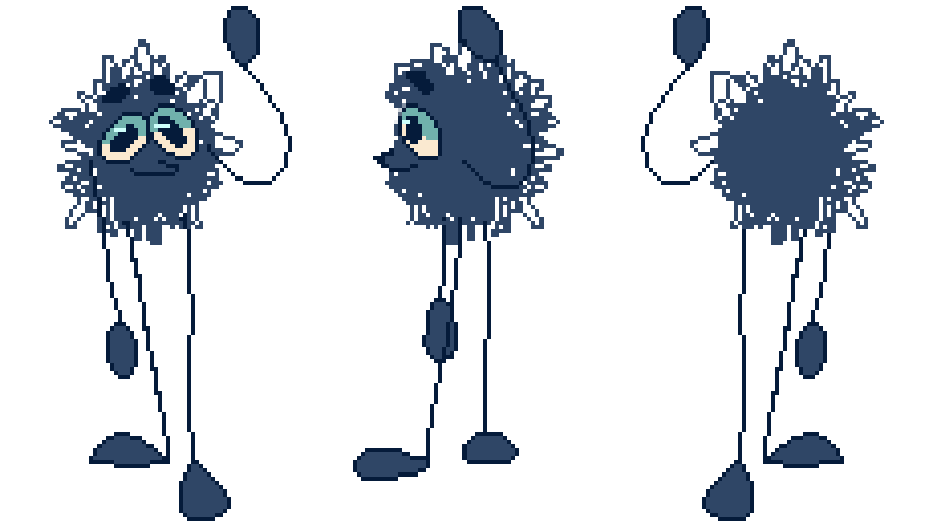
I then decided to quickly create a character turnaround just so that the character can stay consistent throughout our groups various styles. This is a technique that is used in professional animation studios to help the characters stay on model. I made their little mouth stick out a little from the sides and made their forehead be smooth rather than squiggly to make the side profile more readable. This was created in photoshop.
I wanted to incorporate my 3D modelling skills into this project, and so I decided to blend 2D and 3D elements in my animation, inspired by the ENA series, especially the Temptation Stairway episode[4]. It includes rudimentary 3D models rather than fully realistically textured models to help the 2D and 3D elements blend better together.
I also checked out the “Hybrid Animation” book [7] on google scholar and it talks briefly about examples of 2D and 3D hybrid animation (films such as Treasure Planet, Iron Giant and Brother Bear) where they all have a seamless enough blend of both medias. This is important because 3D elements in these examples were used when animators faced difficulties with perspective (Brother Bear and the moose Antlers) and or where some elements had high amounts of detail where it was very tedious to draw frame by frame and so to keep the complexity and to make the animators life easier they used 3D animation (Jon Silver’s arm from Treasure planet). The 3D models were textured to suit the style of their respective 2D films, and so this means I will do a similar thing. Ill use a simple toon shader to make them blend in better. One example of 3D models looking out of place was in Animal Crossing the movie (2006) in the spaceship scene, where one of the metallic elements looks too realistic compared to the cutesy cartoony style of the rest of the movie, which may or may not have been intentional however in my opinion it looked a little unappealing, so I am going to try my best and blend in both the mediums in any way that I can.
Storyboard:

Here the character is dropped onto a building (one that is the centerpiece of the shot and is also the tallest). The camera follows the character slightly.
The character then shakily stands up and looks around, face is revealed.
They walk over to the edge of the building, the angle of the scene changing to a birds eye view where we can see the top of their head.

The character gets scared and backs away and press themself as hard as they can to the wall behind them.
They cower in fear as the buildings seem to grow taller and taller.
The end!
This is a rough idea of what the composition and the camera views are gonna be like so I might experiment more and figure out what works best.
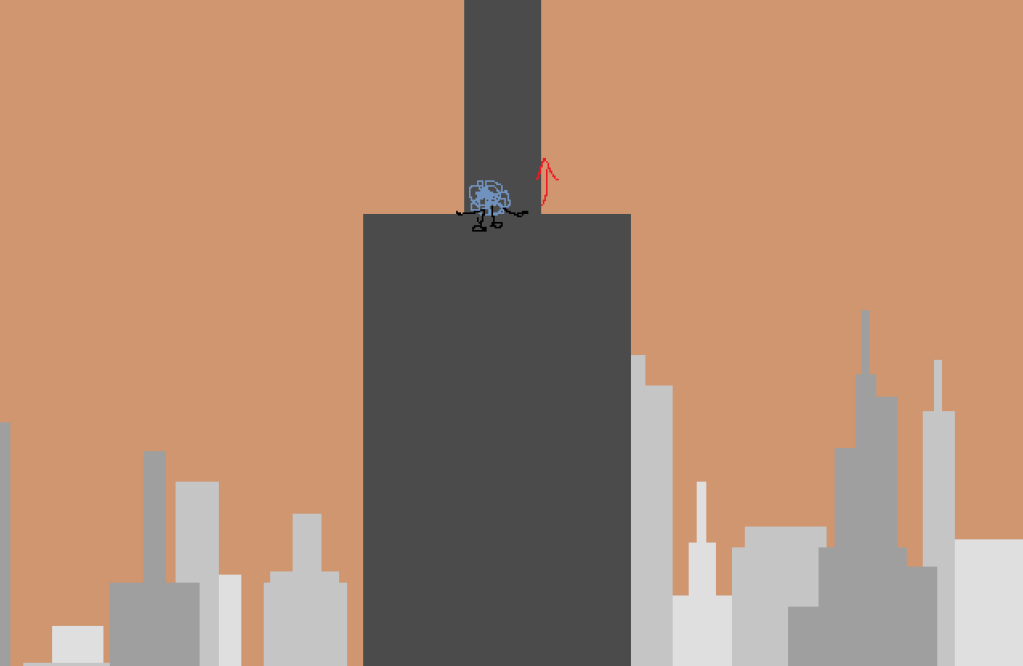
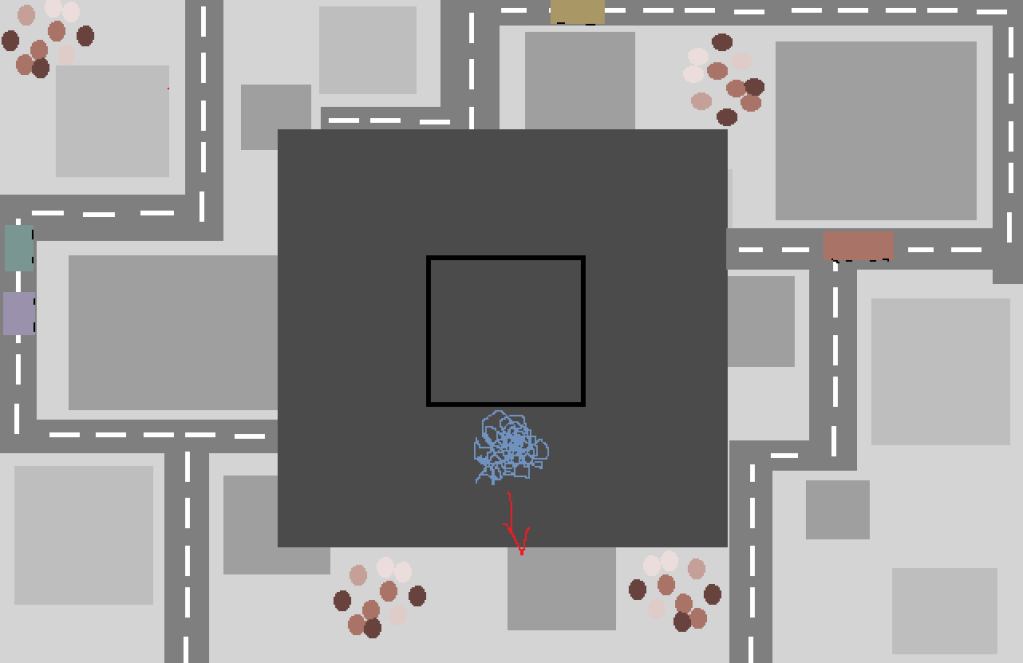
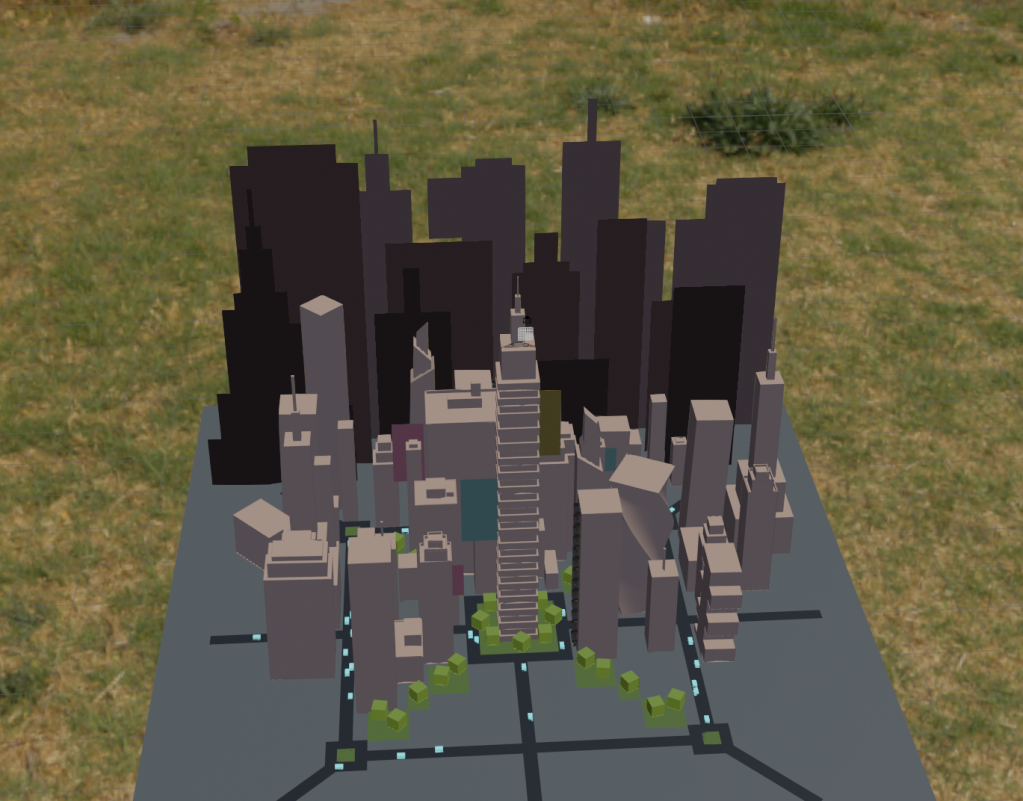
I started modelling a generic city for the setting of the animation. I used the image below to inspire my layout a little bit, but make it more geometrical (I realised too late that its not a real city photo and is in fact a screenshot of a game).
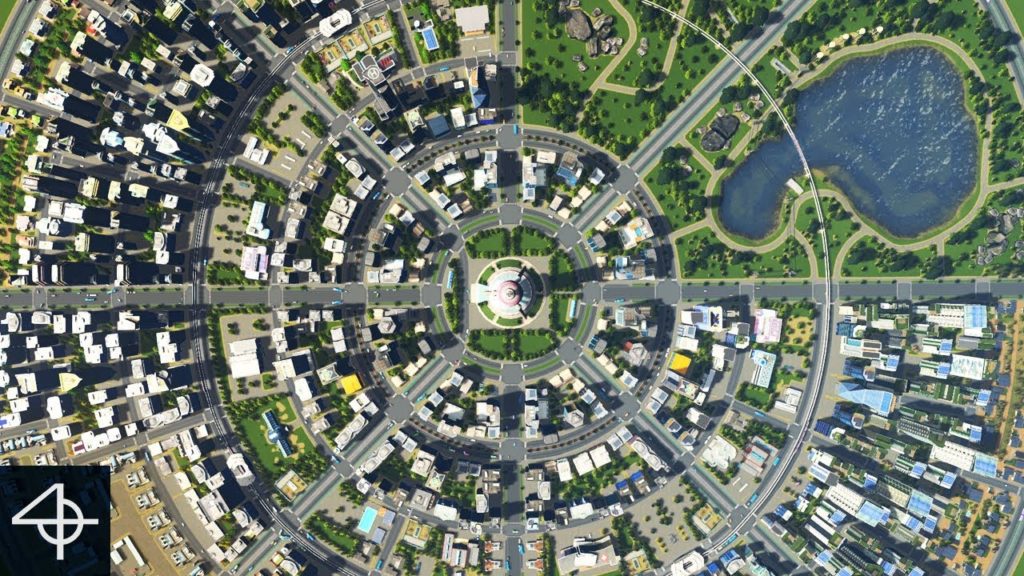
I have added the buildings to only one side of the city to save time and resources (rendering time) and if I needed the city to stay in frame I could just change the angle of the character and the camera. I added cars (the red rectangles) but decided to remove them shortly after.
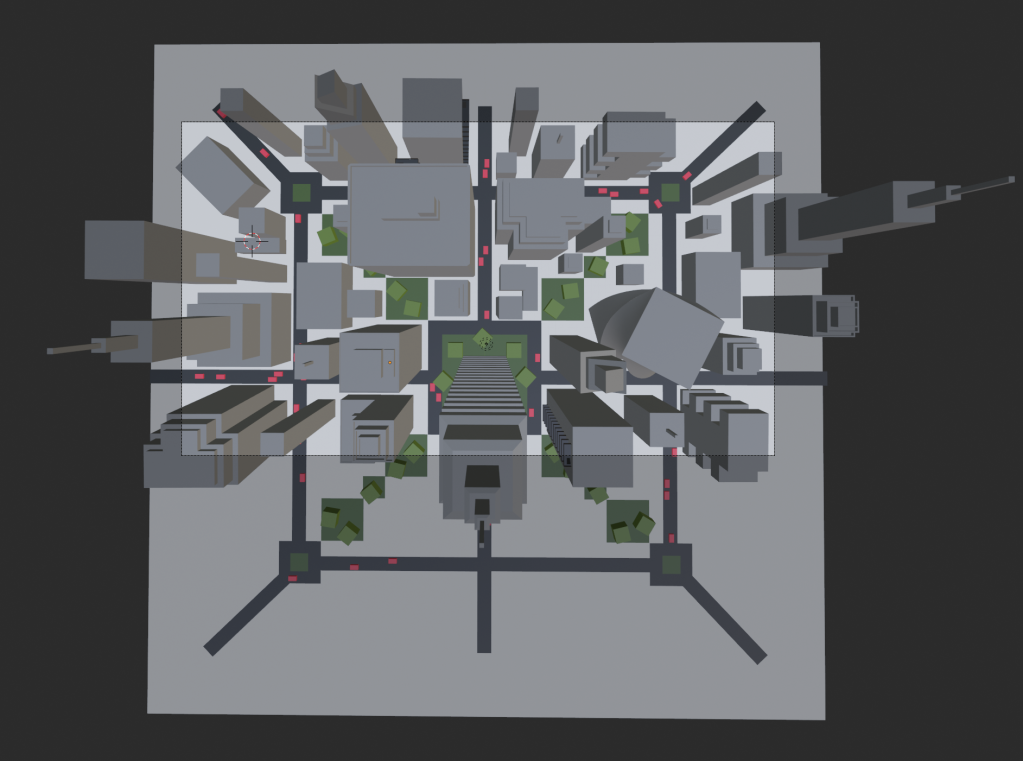
I then added 2D elements in the background to make the city look more full and also more cohesive. I added textures to it but decided to use a cooler colour palette to make the atmosphere more gloomy.
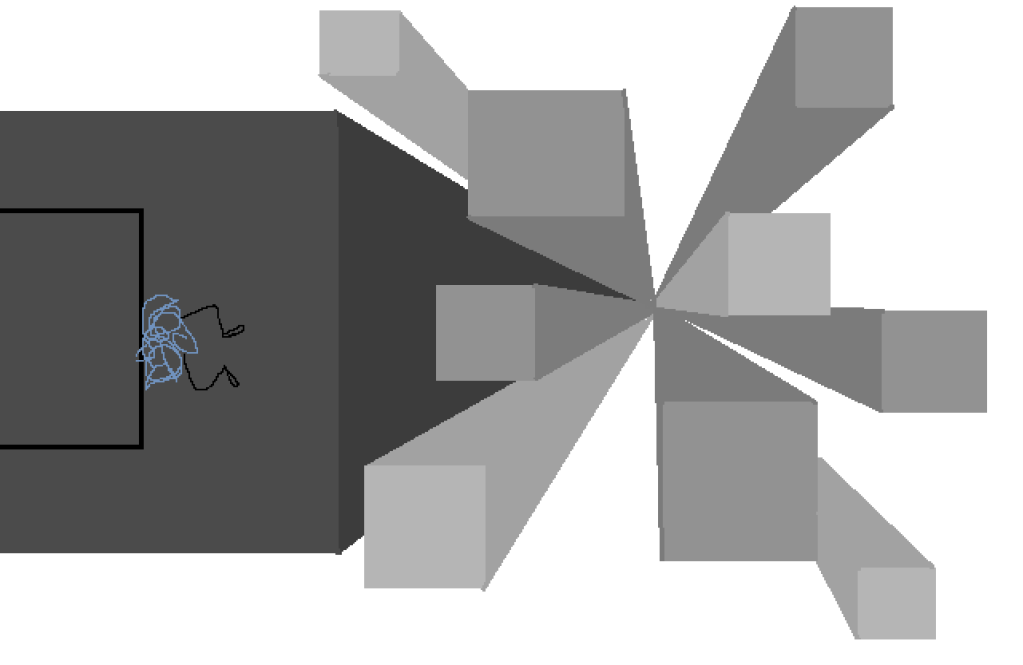
One of the group members (Will) also showed me how to create the dolly zoom effect by changing the focal length (lowering it) and bringing the camera higher and higher. This made it look like the buildings were growing, which conveys the feelings of excitement. I then used a tutorial ([9] Ghibli style clouds for blender) to create clouds that border the city (and cover up any empty space. I also added a bit of fog into the scene to make the city look even more foreboding.

Then it was time to create the 2D animation. I quickly realised that because Blender’s grease pencil is basically a vector program, pixel art wasn’t exactly achievable by hand. There was no pixel brush or anything like that and I couldn’t lower the resolution. So, I decided to draw our character normally in grease pencil on a new project file and then use compositing to create that pixelated look. Here is the result:

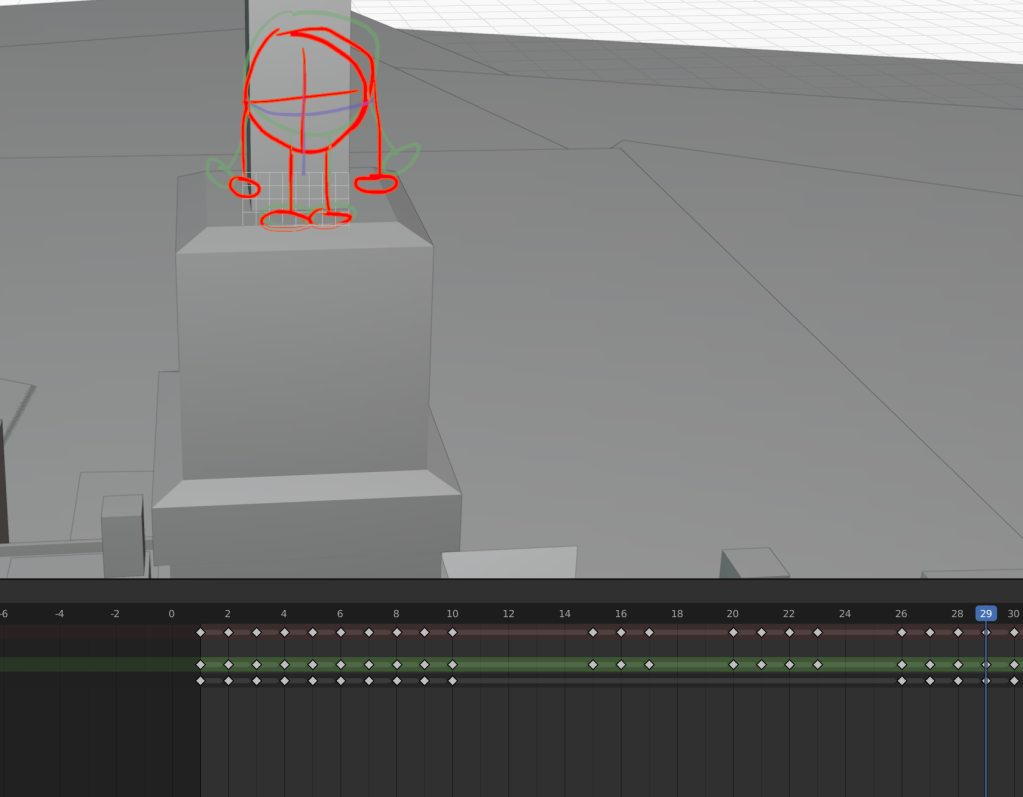
I then went back to my project file and carefully sketched out the rough movement of the character to get the timing right and smooth out any imperfections easily before committing to the animation. I used the standard grease pencil brush and the standard setup, placing the grid on top of the building, and making it face the front. After finalising this I cleaned up the animation and added colour. This process was tedious not only because it was colouring, but also because Blender’s grease pencil combined with 3D is a little hard to control when you have limited knowledge of it. It isn’t very user friendly and the learning curve is quite steep, however I managed to create something I like quite a lot.
After that process I did some pixelating compositing to suit my initial intention of a pixel art style and…, that’s it! Here is what my nodes looked like after the render:

Here is the final animation that will be passed on to Noah who will edit our trailer:
WWW: I enjoyed making the 3D elements and the whole process of creating the clouds. The compositing was also my favourite part as it essentially was the cherry on top of my product.
EBI: I had more time to create the 2D elements. I did not enjoy using grease pencil at all as its not super user friendly however if I had more time id study the program more and create more animation experiments.
Since I was finished with my product, the group and I started brainstorming a logo for our fake production company and so I quickly sketched our idea in MSPaint (you might roll your eyes at this one but its really good for quick sketches). I then took this sketch into photoshop and developed it more.

I added gradients, textured brushes and more definition to the creature behind the door. The little red eye being a spark was also added as I thought it looked cooler and more creepy. Our company is called “𝕽𝖆𝖓𝖈𝖎𝖉𝕾𝖙𝖚𝖉𝖎𝖔𝖘™” and our animation is called “
The trailer, is structured in a way that shows the warnings at the start (because it’s a horror animation) then the logo, then it shows a snippet of my animation, followed by Aidan’s part of animation, then Will’s then Noah’s. Here is the final product, all edited by Noah:
